Tuesday, May 31, 2011

Caramel Pots de Creme

At long last it is my turn to choose a recipe for the Tuesdays with Dorie bakers to bake from Dorie's fabulous book, Baking from My Home to Yours.  We're getting near the finish line, so many of my favorites have been chosen and other recipes that I have not yet baked were baked by the group before I joined in January of 2010.  No matter, though, because every recipe in Dorie Greenspan's fabulous book is a winner.

I decided to suggest Caramel Pots de Creme because this is a recipe that represents some of the things that are wonderful about Dorie:
  • She has encouraged me to try things I've never baked before (and couldn't even pronounce!)
  • She has initiated me into the wonderful world of caramel
  • Her encouraging advice is just like having a friend standing at my shoulder -- and it is good advice in and out of the kitchen:  "The mixture will bubble furiously and may seize -- don't panic, just keep stirring and it will smooth out."  
So here are some pictures of my adventure making Caramel Pots de Creme:
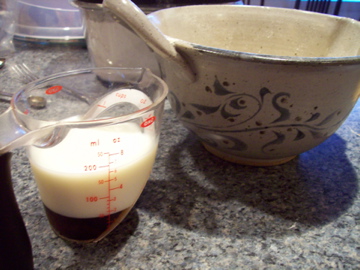
Getting ready

Eggs and sugar set aside

Melting the sugar

Turning to caramel

Stand back!

It might seize up -- don't panic!


The whole set-up into the oven--plastic wrap and all!

Cooling.

I was skeptical of using plastic wrap but used Wegman's Premium Plastic wrap which worked just fine.  By using the plastic wrap, I was successfully able to watch what happened when I jiggled the custard cups and avoided overbaking them.  They were luscious!

And now for the recipe (really, if you don't own the book, you should order it right this minute):

Dorie says:
Pot de creme, or literally, pot of cream, is the French name for what we Americans have loved for centuries and known for equally long as baked or cup custard.  In this recipe, most of the sugar is cooked in a skillet until it caramelizes and turns a deep mahogany color.  Once caramelized, sugar is transformed from its well-known sweet self into a liquid that is slightly bitter, here just bitter enough to give a little edge and a lot of interest to the rich custard.
     If you've got a pot de creme service (a set of dainty china cups with lids), by all means, use it -- there's nothing more elegant.  If you haven't, you can use Pyrex custard cups (the kind sold in most supermarkets), ramekins or espresso cups (actually, espresso cups are my favorites for this recipe).
     Don't be alarmed when you see that the custards are cooked in the oven in a roasting pan covered with plastic wrap.  This is a chef's trick and it's one that translates easily to the home baker.  You needn't worry about the plastic wrap burning -- the oven heat is too low for that.  Just be certain to poke air holes in the plastic as directed, and all will be perfect.  If you are using pot de creme cups, though, skip the plastic wrap -- the lids are all you need.


2 cups heavy cream
1 cup whole milk
3/4 cup sugar
2 large eggs
5 large egg yolks


Getting Ready:  Center a rack in the oven and preheat the oven to 300 degrees F.  Line a large roasting pan with a double thickness of paper towels, then put eight 4-ounce (1/2 cup) custard cups, ramekins, espresso or pot de creme cups in the pan.  Fill a teakettle with water and put it on to boil; when the water boils, turn off the heat.
     Stir the cream and milk together and warm them in a microwave oven or in a saucepan over medium heat; set aside.
     Measure out 1/4 cup of the sugar and set it aside.
     Put a medium heavy-bottomed saucepan (a nonstick pan works well) over medium-high heat and sprinkle in 2 tablespoons of the remaining sugar.  As soon as the sugar melts and starts to caramelize, stir.  When the color is uniform, stir in another 2 tablespoons sugar and continue to stir until it is melted and colored.  Continue with the remaining 1/4 cup sugar, adding it 2 tablespoons at a time.  When all the sugar is deep amber, almost mahogany colored, stand away from the pan, so you don't get splattered, and stir in the warm liquid.  The mixture will bubble furiously and may seize -- don't panic, just keep stirring, and it will smooth out.  Pull the pan from the heat.
     Put the eggs, yolks and reserved 1/4 cup sugar in a large glass measuring cup or a small bowl and whisk until pale and slightly thickened.  Still whisking, drizzle in a little of the caramel liquid -- this will temper, or warm, the eggs so they won't curdle.  Whisking all the while, slowly pour in the remaining liquid.  If there is foam at the top of the custard, skim it off with a spoon (foam isn't fatal, but it will turn into little craters on the top of the baked custards).  Pour the custard into the baking cups.
     Pour enough hot water from the teakettle into the roasting pan to come halfway up the sides of the cups.  Cover the pan snugly with plastic wrap, poke two holes in two opposite corners and very carefully and steadily slide the setup into the oven.
     Bake the custards for 35 to 40 minutes, or until the tops darken and custards jiggle a little only in the center when tapped or lightly shaken.
     Gingerly remove the roasting pan from the oven and place it on a cooling rack.  Allow the custards to rest in their warm bath for 10 minutes, then peel off the plastic wrap and transfer the cups from the water (careful -- they're still hot) to the cooling rack.  Refrigerate when they reach room temperature.  When the pots de creme are cool, cover them tightly with plastic wrap or their little lids.


Serving:  The pots de creme are most elegant served at cool room temperature, but still irresistible chilled.  If they've been in the fridge for several hours or overnight, let them sit on the counter for about 20 lminutes before bringing them to the table.  These custards need no embellishments -- they're perfect just as they are -- but I find that a swirl of very lightly whipped cream makes a nice finish touch; a light, cool, refreshing counterpoint to the luxurious custard.

Tuesday, May 24, 2011

Oatmeal Nutmeg Scones

It's so much fun to make scones!  And with the Oatmeal Nutmeg Scones, this week's Tuesdays with Dorie pick, there was the added fun of grating fresh nutmeg.  Maybe it was the nutmeg that threw me off, but I almost made a major goof.  The recipe calls for one Tablespoon baking powder and one-half teaspoon baking soda.  I got them both out and dumped in a full tablespoon of baking soda!   An easy mistake to make with containers that look sooooo similar, right?!!


Happily, I realized my mistake immediately and was able to fish out the extra baking soda.

From that point on, I paid close attention to what I was doing!  Mixing the butter into the flour with my fingers is a delightfully tactile experience.  I took Dorie's "playing around" advice and mixed in some diced banana for an extra bit of pizzazz.  I took the scones to my weekly brunch where they were much enjoyed.


Thanks to Patricia from Life with a Whisk for choosing these wonderful scones.  And next week it's my turn to choose--can't wait to make Caramel Pots de Creme.

Tuesday, May 17, 2011

Maple Cormeal Biscuits

Tonight I made Maple Cornmeal Biscuits, Lindsay's Tuesdays with Dorie choice of A Little Something. . . Sweet!  They are terrifically easy to mix up and have the added benefit of having corn meal and maple syrup as ingredients so it's easy to convince yourself that they are healthy!   I poured the milk into the measuring cup and then added the maple syrup.  I'm easily amused and so was delighted that the syrup settled to the bottom of the cup; doesn't it look amazing?

We were trying to decide if we would go out and pick up a sandwich before a meeting or stay in.  I mentioned to my husband that I could bake up some biscuits and he immediately opted for leftovers and homemade biscuits rather than going out.  A fine choice!

Here's dinner tonight:  (hummus and pita has already left the plate) but here's the leftover salmon, watermelon, and Dorie's fabulous biscuits with cherry preserves!

Tuesday, May 10, 2011

Brown Sugar Bundt Cake

Well, I have made this in the past and my note in the cookbook is that it is a very moist, delicious cake.  This time, because I had hazelnuts on hand, I decided to make the nut version.  Wow!  This is so yummy!  An absolutely lovely flavor and a divine texture.  A perfect thing to bake for myself (and my dear ones) on Mother's Day!

Thanks to the other Peggy in the Tuesdays with Dorie group from Pantry Revisited.  Check out her blog for the recipe!

Monday, May 9, 2011

Fresh Mango Bread

The batter is quite stiff
As much as I love fruit, I am not a big fan of mangos.  I think that's because I've never had a really good one.  My goal is to bake everything in Dorie Greenspan's fabulous book, Baking from My Home to Yours, and so when Rich bought mangos, I decided now was the the time.

The batter is basically what I think of as a carrot cake batter in that a flavorless oil is used rather than butter.  The spices are ginger, cinnamon, and some lime zest.

The mango is quite pretty

Rich cut up the mango (this was quite pretty!), and I stirred it in.

The bread needed to bake a long time--about an hour and a half.  It spilled over the top of my loaf pan!
Stirring in the raisins, mango, and lime zest.


The loaf, ready to be tasted!
The verdict is that, while tasty, the mango flavor did not permeate the bread.  Maybe we cut it in chunks that were too large.  Maybe the mango wasn't ripe enough.  Who knows?!  Since Dorie has so many recipes that are fantastic, I probably bake lots of others again before I give this another try.

Tuesday, May 3, 2011

Basic Marbled Loaf Cake

This week the Tuesdays with Dorie bakers are baking a wonderful Basic Marbled Loaf Cake.  It highlights a fantastic feature of Baking from my Home to Yours, called Playing Around.  In addition to the basic recipe, Dorie Greenspan often includes ideas for varying the recipe.  Check out the Tuesdays with Dorie blog to see many wonderful variations.

About a year ago, I baked the variation that included white chocolate in the white marble part of the cake.  I remember buying a good, expensive white bar chocolate and I remember paying for it.  But when I unpacked the groceries at home, my white chocolate wasn't there.  What a disappointment!   At any rate, I didn't have time to go back to the store so I melted some Ghirardelli white chocolate chips that I had on hand.  They glumped up when they cooled and ended up being rather chunky in the batter.  The cake was delicious nonetheless, but the white chocolate flavor didn't permeate the white batter.

This time I sent my sweet husband to the store and he came back with two bars of lovely white chocolate.  It melted perfectly and very easily mixed into the batter.  And I added peppermint extract to the white chocolate batter--Dorie did say that this was her favorite variation.

The result was wonderful!  The cake is lovely, moist, and has that happy hint of mint.  The marbling was beautiful and changed with each slice.  I wish I had taken more pictures, but thought it a bit rude to jump up with the camera each time one of my guests cut a slice!


For the recipe, and to read about her own baking adventures, visit Carol of The Bake More.