Tuesday, February 28, 2012

Coconut-roasted Pineapple Dacquoise

Well.  This was a project!  But each piece can be made ahead which is always a welcome feature in a fancy, multi-step dessert.

Dorie says that a dacquoise is typically two round meringue discs which sandwich something yummy.  This has three layers of rectangular meringues--the meringues have coconut and ground almonds in them--which sandwich layers of white chocolate whipped cream, and roasted fresh pineapple.  The whole thing is spread with the whipped cream and then the sides are decorated with toasted coconut.  Gorgeous!  And delicious!
Getting ready to spread the meringue on the parchment paper.

Meringues ready to go into the oven:  3 hours at 225 degrees.

The chopped white chocolate, ready for the 3 cups of boiling heavy cream.

Pineapple!

Cutting up the pineapple.  (A few pieces missing--eaten by the baker.)

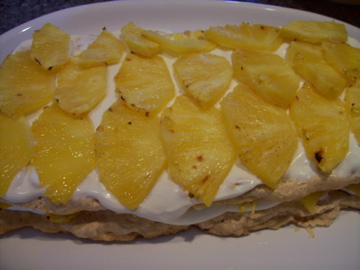
Building the dacquoise--this is the second layer.

A side view of the finished dacquoise.  

Tuesday, February 21, 2012

Chocolate Truffle Tartlets

The sensible part of me wants to avoid buying specialty pans that I won't use very often.  Okay, I admit to buying a mini madeleine pan but I'm proud to say that I resisted buying a kugelhopf pan.

This week's Tuesdays with Dorie pick is Chocolate Truffle Tartlets.  To make this recipe as written you need  six 4 1/2 " tartlet pans.  Well.  I own two 4" pans, one 7 1/2" pan and one 9" pan.  I love making tarts because whenever I do, I feel like I have leapt over the dividing wall between home baker and "professional" baker.  My tarts always come out beautifully perfect, thanks to Dorie Greenspan's excellent recipes.

So I hemmed and hawed about buying 4 more little tart pans and finally decided I would splurge and do it.  My husband and I went to our local cooking supply store and to complicate my decision-making process, they did not have 4 little pans!  They did have something that resembled a muffin tin with 4 tarts built in.  But somehow, that was not as appealing as 4 little individual tart pans.  And it was $26 which seemed like a bit of a splurge for something I didn't really need or want.

Next to the metal pans, they had stiff paper tart pans in assorted sizes--none of which were the size I was looking for!  And they seemed pretty pricey for something that you were going to toss away.  Plus I wasn't convinced that they'd provide the nice edge that metal tart pans do.

I left the store without having bought a thing!  Instead, I did the math and decided to use my two little pans and the 7 1/2 incher that I already owned.

The crust is made ahead and is sort of a cross between a pie dough and a cookie sweet crust.

Fitting the crust into one of the cute little 4" pans


Rolling out the dough onto freezer paper--a brilliant idea which prevented the dough from sticking.
I was so pleased with the dough!

I rolled the dough onto the rolling pin to move it to the pan.
The chopped white chocolate, milk chocolate, and homemade biscotti--ready to be stirred into the filling.

 Okay, so I have no pictures of making the filling because you need to be on your toes and your hands are really busy!


The cooling tarts.

Ready for my guests which somebody called a Mickey Mouse arrangement (!) with additional choices of chocolate biscotti and heart-shaped speculoos.  

Before the large tart was entirely eaten!

One comment about the texture:  when I was preparing the tarts, I had a bit of crust and a bit of filling left over so I put that in a little ramekin and baked it.  The recipe says to let cool for 20 minutes and then serve, so after 20 minutes, I tasted the ramekin tart.  The filling was gooey--almost pudding-like--and delicious!  A couple of hours later when I served the tarts to my guests, the filling was more solid.  Still very delicious.  I'm anxious to read about other Tuesdays with Dorie bakers' experiences.

For this recipe, rush right out and buy Dorie Greenspan's Baking with Julia or visit this week's Tuesdays with Dorie hosts,Spike of Spike Bakes or Steph of A Whisk and a Spoon.

Tuesday, February 7, 2012

Basic White Loaves

So here we go!  My Baking with Julia book by Dorie Greenspan is pristine--no chocolate splotches, nor flour in the page creases, nor cover slick with a patina of butter.  I'm ready to begin baking through the book with over 300 other bakers who have joined Tuesdays with Dorie.   (And, since I have just over a dozen recipes to finish up in Dorie's fabulous Baking from My Home to Yours, I'll sneak in a few reports as I finish up those recipes.)

This week, we started out with Basic White Loaves, chosen by our founding mother, Laurie, and her able co-mother, Jules.

First, you must know that my husband and two of my sons have embarked on experiments baking artisan breads.  On the weekends, we have heated pizza stones, spritz bottles to add steam, razor blades for cutting decorative tops, and most noticeably, bowls of yeasty starter dough rising around the kitchen.  All well and good, but I what I loved about this recipe was its simplicity.

Short and sweet:
I used the dough hook on my mixer.  No hand kneading necessary!


I let the dough rise, then formed it and let it rise again.


The two loaves were perfect in appearance and wonderful, basic white bread!

This week I also baked Dorie's Chocolate Cream Tart, a delicious tart with a chocolate sweet tart crust, a lovely creamy chocolate filling,  whipped cream on top, a a generous scattering of chocolate shavings.  Dorie says to eat this within two hours of serving which was not a problem for my Monday night guests.  In fact, one was seen scraping the last bit of chocolate off the serving plate with her finger!


Tuesday, January 31, 2012

Chocolate Caramel Chestnut Cake

 I'm finishing up baking through Dorie Greenspan's great book Baking from My Home to Yours and most of the remaining recipes either require special ingredients, are time-intensive to bake,  serve a large number of people, or don't store well.  The Chocolate Caramel Chestnut Cake fits ALL of those criteria!

Finding chestnut puree was difficult but we accidentally stumbled on it in a specialty store in Seattle while visiting my son.  We ended up mailing it home as TSA has restrictions on what can go into carry-on luggage!  We found whole chestnuts here in Rochester at our well-stocked Wegmans.

I started baking this the day before I was to serve it, spending lots of time shaving chocolate (which is somehow very satisfying--much easier than chopping onions!)

I made a lovely caramel which was lightly flavored with cinnamon by adding a cinnamon stick while cooking.  Then the caramel is poured over a mixture of milk and bittersweet chocolate, stirred, and chilled overnight.

The cake is baked in a 9" square pan and includes the chestnut puree.  Once cooled, the cake is sliced horizontally into three layers using a long serrated knife (or a not-quite-long-enough serrated knife in my case!).

Slicing into layers
A layer ready for the syrup
A syrup made from brandy and brown sugar is drizzled over two of the layers and the ganache filling is spread between the layers onto which chopped chestnuts are sprinkled.  The remaining ganache covers the cake's sides and tops.  One thing I love about Dorie's recipes is that the proportions are right:  if she says to cover the sides and top of the cake, you can be sure there is enough ganache to do it!

Ganache on the middle layer
Then chopped chestnuts on the middle layer
Ganache over all
That gets chilled and then the bittersweet chocolate glaze, which was made four hours before, is poured over, and chilled till the glaze sets.  I almost had a disaster at this point as the whole cake nearly slid off the flat platter I had it on as I was moving it to the "cold room" to chill.

The bittersweet chocolate glaze
The final decoration of chestnuts makes this cake beautiful!

The decorative chestnuts add the final touch!
The guests were amazed and delighted and it was a fine success.  As I had been snacking on the various components, I already knew that it would be sophisticated and delicious.
A view of the cake eaten halfway.


Tuesday, January 24, 2012

Apple Turnovers

Oh my gosh, these were tasty!  With fewer than 20 recipes left to bake in Dorie Greenspan's fabulous book, Baking from My Home to Yours, I recently baked these wonderful Apple Turnovers.

I must admit to having a bit of trouble with the dough.  It's basically flour & butter into which you stir sour cream.  Dorie cautions not to overwork the dough, but I don't think I mixed it enough because even after chilling, it was crumbly.  That would never do so I tossed the dough into the food processor and pulsed it until it began to hold together (a trick I learned from making her basic pie dough and sweet tart dough).

I rolled it out and folded in in thirds, then it went back into the fridge.  When I pulled it out a couple of hours later, it was hard to roll thin.  Just too chilly, I guess. When I tried to cut 4" rounds with my tart pan, I ended up cutting my thumb!  No blood on the dough, fortunately.  I ended up using a 3" round cutter and then rolling it a bit more.

The apple filling was lovely--no problems there.  The turnovers went together easily and came out looking wonderful.  They were flaky and delicious--much admired by the folks who came to begin planning a contra dance weekend for the fall of 2012.  Yummy treats always make the meetings go better!


Wednesday, January 18, 2012

Tiramisu Cake

A bunch of people were expected this week for soup, bread, and desserts.  I'm down to 20 recipes in Dorie Greenspan's Baking from my Home to Yours, and wanted to bake something fit for a crowd.  Tiramisu Cake!

This is a layer cake, the layers of which are soaked with an espresso syrup.  The filling is mascarpone, whipped cream, and powdered sugar, with shaved chocolate on top!

I put off baking this cake because it serves 10 generous pieces and was therefore in need of a crowdI  Also, sorry to admit, but I am not a fan of coffee.  One thing that I've learned from baking through Dorie's book, however, is that a teaspoon of espresso powder in a chocolate dessert--brownies, for instance--goes a long way in intensifying the chocolate flavor without making you think "oh this has coffee in it".  Tiramisu Cake, on the other hand, has lots more coffee flavor and my guests thought it was delicious.

I had a bit of trouble with the frosting.  Made of mascarpone, powdered sugar and whipped cream, it was entirely too runny.  Dorie says to put it in the fridge for 15 minutes, but even leaving it for half an hour wasn't enough. Since I had to chill the whole cake for 3 hours before serving, I was in a bit of a time crunch.  I poured the frosting on and some of it dribbled down the sides, collecting on the waxed paper strips I'd put there.  (I'm sorry now that I didn't take a picture--it was rather humorous.)  The flavor (for coffee lovers) was terrific and I a dusting with cocoa concealed any imperfections.  If I make this again, I'll be sure to allow extra time to chill the frosting in the fridge.

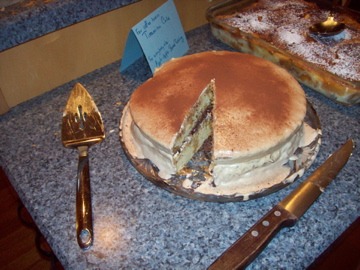
Tiramisu Cake 

Giving the unbaked bread pudding "the back of the spoon treatment"
For the non-coffee lovers in the crowd, I baked Dorie's  Apple-apple Bread pudding.  It's wonderful and I have made it a couple of times in the past. This time I used home-made Challah.  Delish!

Tuesday, January 10, 2012

Creamiest Lime Cream Meringue Pie

I always love to read Dorie's introductory comments to her recipes.  For this one, she suggests that this pie is really good anytime, she especially enjoys it in the heat of summer.   We're not exactly in the heat of summer here in Rochester, NY, but I did have guests coming so I decided to bake something that needed to be eaten the day it was made.

One of the great things about baking through Dorie Greenspan's fabulous book, Baking from my Home to Yours, is that I have learned and practiced many new techniques.  In this recipe, for example, grated lime zest is added to sugar and then you use your fingers to mix it in.  It feels great to do this and the lovely aroma of lime is a real treat to the nose!

The next new technique is to mix the cream over simmering water which has the effect of heating the cream very evenly.  Whisking all the time is fun, although since I'm short, I usually stand on a little stool by the stove so my arm doesn't get so tired!

Dorie makes full use of her food processor and with this recipe, you strain the cream into the bowl of the food processor, tossing out those crunchy bits of lime zest.  You wait until the temperature decreases a bit, then turn on the processor and add butter, butter, and more butter, until you have the smoothest, creamiest line cream you can imagine.

One benefit of this dessert is that you can make the cream a day ahead--actually since it needs to chill, that's the best way to do it.  Dorie tells you to put it into a bowl and put a piece of plastic wrap directly onto the cream.  This is one of the techniques she uses over and over again but which was new to me.

A few hours before you want to serve the pie, you give the cream some good stirs and put it into the pie shell.  Then you beat up the meringue, put it under the broiler till brownish, and pull it out.  Dorie says you can use a torch to brown up the meringue and that's something I don't yet own but I imagine that it could be lots of fun!

Rolling out graham crackers for the crust

Zesting the limes

Getting ready to mix the lime zest with the sugar.  Couldn't take a picture of the process because my fingers were covered with sugar!

Straining the cream into the food processor.


The cream in the pie shell

Whipping up the meringue

The pie with the browned meringue

The dessert offerings for my guests!
I served this pie to guests along with Dorie's Bittersweet Brownies and Cocoa-Almond Meringues (I used ground macadamia nuts instead of almonds in these).  Everything was entirely consumed with oooos and ahhhhs and rave reviews.  As my friend Ruth was leaving, she pointed at the nearly empty serving plates and said, "That was the best lime pie I've ever eaten.  And those were the best meringues I've ever eaten!  And those were the best brownies I've ever eaten!"   Three winners indeed!  Thanks Dorie!